Tuesday, July 31, 2018
Thursday, July 26, 2018
Mobile/Fluid Approvals in PeopleSoft
So you are looking to enable mobile/fluid approvals in PeopleSoft?
I'll give brief steps and explanation on how to enable and configure fluid approval pages.
Setup Security:
Give users who plan to use mobile approvals proper security, there is delivered role Approvals Fluid. After assigning this role to users, users will be able to see the mobile/fluid approvals pages.
Publish Tile:
If there is a need to modify delivered mobile/fluid pages use Page Composer and Page Composer Dev Registration to modify look and feel of the pages, adding additional fields etc
Note: Navigation to Page Composer and Page Composer Dev Registration can be found in Portal - Structure and Content - Fluid Structure Content - Fluid Pages - Common Architecture. You can add both tiles to your homepage.
Using Page Composer you can:
I'll give brief steps and explanation on how to enable and configure fluid approval pages.
Setup Security:
Give users who plan to use mobile approvals proper security, there is delivered role Approvals Fluid. After assigning this role to users, users will be able to see the mobile/fluid approvals pages.
Publish Tile:
- Go to PeopleTools - Portal - Structure and Content - Fluid Structure Content - Fluid HomePages
- Edit the HomePage label where you want to publish the Approval Tile, in Tile Content navigate to group box PeopleSoft Common Architecture and make sure Approvals check box is checked and select Opt-Dflt (Optional Default) drop down value or any other value based on your requirement then use Tile Publish button on the top of the page to publish the tile. (Note: After clicking tile publish button, on the modal page make sure Approvals tile checkbox is selected the publish)
- Verify that all users with Approvals Fluid role are seeing Approvals tile on the home page you published on step 2.
If there is a need to modify delivered mobile/fluid pages use Page Composer and Page Composer Dev Registration to modify look and feel of the pages, adding additional fields etc
Note: Navigation to Page Composer and Page Composer Dev Registration can be found in Portal - Structure and Content - Fluid Structure Content - Fluid Pages - Common Architecture. You can add both tiles to your homepage.
Using Page Composer you can:
- add or remove additional sections
- add or remove additional fields
- modify look and feel.
Using Page Composer Dev Registration tile you can:
- add additional pages for specific form factor,
- add source records to get and display data on the page
- add PeopleSoft logic by mapping field events to custom app packages.
Workflow:
InShort, Mobile/Fluid pages use existing AWE setup for approvals routing and notifications.
Note: If there are customizations on your AWE, use Page Composer Dev Registration to change application source records and composition key fields then use Page Composer to add custom fields on to your approvals pages.
Configure Mobile Approval Options:
Navigate to Root - Enterprise Components - Approvals - Mobile Approval Options
You can specify various options on how mobile approvals will work like the number of approval lines to display, allow/deny mass approvals, display or hide Approve/Deny/Pushback/Hold buttons, making comments required when denying the transaction or changing images on navigation of specific approval component.
Subscribe to:
Posts (Atom)
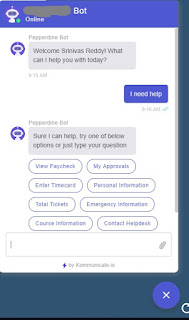
Using Third party Tools to create Chatbot in PeopleSoft Part 3
This is final post to demo the working chatbot in PeopleSoft. Kommunicate supplies you with HTML code to add their chat badge on your Peo...
-
So you are looking to enable mobile/fluid approvals in PeopleSoft? I'll give brief steps and explanation on how to enable and configu...
-
PeopleSoft Fluid does not have default search page like in Classic. There are 3 ways for now to create your search page: 1. Real-Time S...
-
 Here we go with Part 2 on how to accomplish this task Step 1 . Create two classic pages in PeopleSoft to add news content, pages can be c...