Tuesday, July 31, 2018
Thursday, July 26, 2018
Mobile/Fluid Approvals in PeopleSoft
So you are looking to enable mobile/fluid approvals in PeopleSoft?
I'll give brief steps and explanation on how to enable and configure fluid approval pages.
Setup Security:
Give users who plan to use mobile approvals proper security, there is delivered role Approvals Fluid. After assigning this role to users, users will be able to see the mobile/fluid approvals pages.
Publish Tile:
If there is a need to modify delivered mobile/fluid pages use Page Composer and Page Composer Dev Registration to modify look and feel of the pages, adding additional fields etc
Note: Navigation to Page Composer and Page Composer Dev Registration can be found in Portal - Structure and Content - Fluid Structure Content - Fluid Pages - Common Architecture. You can add both tiles to your homepage.
Using Page Composer you can:
I'll give brief steps and explanation on how to enable and configure fluid approval pages.
Setup Security:
Give users who plan to use mobile approvals proper security, there is delivered role Approvals Fluid. After assigning this role to users, users will be able to see the mobile/fluid approvals pages.
Publish Tile:
- Go to PeopleTools - Portal - Structure and Content - Fluid Structure Content - Fluid HomePages
- Edit the HomePage label where you want to publish the Approval Tile, in Tile Content navigate to group box PeopleSoft Common Architecture and make sure Approvals check box is checked and select Opt-Dflt (Optional Default) drop down value or any other value based on your requirement then use Tile Publish button on the top of the page to publish the tile. (Note: After clicking tile publish button, on the modal page make sure Approvals tile checkbox is selected the publish)
- Verify that all users with Approvals Fluid role are seeing Approvals tile on the home page you published on step 2.
If there is a need to modify delivered mobile/fluid pages use Page Composer and Page Composer Dev Registration to modify look and feel of the pages, adding additional fields etc
Note: Navigation to Page Composer and Page Composer Dev Registration can be found in Portal - Structure and Content - Fluid Structure Content - Fluid Pages - Common Architecture. You can add both tiles to your homepage.
Using Page Composer you can:
- add or remove additional sections
- add or remove additional fields
- modify look and feel.
Using Page Composer Dev Registration tile you can:
- add additional pages for specific form factor,
- add source records to get and display data on the page
- add PeopleSoft logic by mapping field events to custom app packages.
Workflow:
InShort, Mobile/Fluid pages use existing AWE setup for approvals routing and notifications.
Note: If there are customizations on your AWE, use Page Composer Dev Registration to change application source records and composition key fields then use Page Composer to add custom fields on to your approvals pages.
Configure Mobile Approval Options:
Navigate to Root - Enterprise Components - Approvals - Mobile Approval Options
You can specify various options on how mobile approvals will work like the number of approval lines to display, allow/deny mass approvals, display or hide Approve/Deny/Pushback/Hold buttons, making comments required when denying the transaction or changing images on navigation of specific approval component.
Friday, June 29, 2018
AJAX call to Web API then use JSON data source
Here is an example on how to make AJAX call to Web API.
To explain this scenario I will give an example of how to make weather API call, before we dive into how to code, let's see the end product:
 You can use PeopleSoft input field as well to make AJAX call but for demo I used HTML area on a PeopleSoft page.
Here is step by step process on how to do this:
1. Create a fluid page and add tile on to your homepage.

2. Create work record and add HTMLAREA field to the work record, create new HTML definition, then insert HTML area on your fluid page and assign this work record.field name to page's HTML area.
3. In page activate add following peoplecode, this populates your HTML area with your HTML code, you will be writing HTML code in next step
AJAX_WTHR_WRK.HTML_AREA_01.Value = GetHTMLText(HTML.AJAX_WEATHER_CALL);
4. Now add following code to your newly created HTML definition from step 2
5. Test your code from your fluid tile, you will have working weather app
Here is how this code is working:
In your HTML area, you have two div elements, one takes input and other gives you the output.
In the input text area, we are using oninput DOM Event to call loadAJAX function from JavaScript, the movement browser detects user input loadAJAX function is called.
<input type="text" id="CityOrZipCode" oninput="loadAJAX()" Value="">
In loadAJAX function, we are making an XMLHttpRequest AJAX call to our weather API url, this silently makes the call behind the scenes of the browser and updates your page elements without refreshing the whole page, thereby reducing traffic between server and client.
If you right-click and inspect your browser on Network tab you will notice how we are sending requests to browser and getting the response. Status 404 says bad request and 200 is a success.
When we typed D or Da in the input text area weather API call failed, but the moment it found a city with Dal, Dall or Dallas it returned status 200.

This code checks if AJAX call is a success:
if ((request.readyState === 4) && (request.status === 200))
Since our AJAX call is successful, now we are getting JSON response then parse it, then get the values you need from JSON and do required calculations and store your values in variables.
Using DOM's innerHTML property we will update the output div elements with the variables we created.
var modify = document.getElementById('Update');
if (!CityOrZipCode) {
modify.innerHTML = "Enter City or Zip Code";
} else {
modify.innerHTML = "Bad Request, City or Zip Code not found";
}
var WindSpeedmodify = document.getElementById('WindSpeedUpdate'); WindSpeedmodify.innerHTML = "";
This example should give you a good starting point to add AJAX to your pages.
To explain this scenario I will give an example of how to make weather API call, before we dive into how to code, let's see the end product:

Here is step by step process on how to do this:
1. Create a fluid page and add tile on to your homepage.

2. Create work record and add HTMLAREA field to the work record, create new HTML definition, then insert HTML area on your fluid page and assign this work record.field name to page's HTML area.
3. In page activate add following peoplecode, this populates your HTML area with your HTML code, you will be writing HTML code in next step
AJAX_WTHR_WRK.HTML_AREA_01.Value = GetHTMLText(HTML.AJAX_WEATHER_CALL);
4. Now add following code to your newly created HTML definition from step 2
5. Test your code from your fluid tile, you will have working weather app
Here is how this code is working:
In your HTML area, you have two div elements, one takes input and other gives you the output.
In the input text area, we are using oninput DOM Event to call loadAJAX function from JavaScript, the movement browser detects user input loadAJAX function is called.
<input type="text" id="CityOrZipCode" oninput="loadAJAX()" Value="">
In loadAJAX function, we are making an XMLHttpRequest AJAX call to our weather API url, this silently makes the call behind the scenes of the browser and updates your page elements without refreshing the whole page, thereby reducing traffic between server and client.
If you right-click and inspect your browser on Network tab you will notice how we are sending requests to browser and getting the response. Status 404 says bad request and 200 is a success.
When we typed D or Da in the input text area weather API call failed, but the moment it found a city with Dal, Dall or Dallas it returned status 200.

This code checks if AJAX call is a success:
if ((request.readyState === 4) && (request.status === 200))
Since our AJAX call is successful, now we are getting JSON response then parse it, then get the values you need from JSON and do required calculations and store your values in variables.
Using DOM's innerHTML property we will update the output div elements with the variables we created.
var modify = document.getElementById('Update');
if (!CityOrZipCode) {
modify.innerHTML = "Enter City or Zip Code";
} else {
modify.innerHTML = "Bad Request, City or Zip Code not found";
}
var WindSpeedmodify = document.getElementById('WindSpeedUpdate'); WindSpeedmodify.innerHTML = "";
This example should give you a good starting point to add AJAX to your pages.
Wednesday, April 11, 2018
Real-Time Search using Pivot Grids
Real time search using pivot grids is same as finding existing value in classic search page. Fluid search page will enable users to search for a value and thus display transaction page based on serach value selected from search results.
Steps to create pivot grid based search:
1. Create your fluid component and add valid search record you want to use, in internet tab make sure Search radio button is selected and set search type to Standard in fluid tab
2. Create your fluid page and insert into your fluid component
3. Create a pivot grid model by selecting data source as component, and give name of appropriate fluid component you created in step 1 (Note that only one pivot grid model can be associated with the fluid component)
4. Pivot grids model you created is by default set to chart the only view and cannot be changed
5. Access your fluid page from online/tile now after registering on portal, it should bring up the search page based on options you selected in Pivot Grid Model.
Thursday, March 22, 2018
SEARCH in Fluid Pages
PeopleSoft Fluid does not have default search page like in Classic. There are 3 ways for now to create your search page:
1. Real-Time Search using Pivot Grids
2. Keyword Search using SES
3. Custom Search Page
Here are the brief details on how to configure these search pages:
1. Real-Time Search using Pivot Grids
Create a pivot grid using the Pivot Grid Wizard (Reporting Tools-Pivot Grid-Pivot GridWizard),using your component as the data source. The Pivot Grid Wizard then generates the underlying query using the search keys defined on the records in the component and populates the search page.
2. Keyword Search using SES
The keyword search runs against a search index built using the PeopleSoft Search Framework and deployed to the search engine, such as Oracle SES. The search will not reflect changes to the database table until the search indexes are refreshed.
3. Custom Search Page
You can create your own search page and define it as a page type of search page. When you put the search page in your component it will run after SearchInit and before SearchSave PeopleCode.
You will have access to the component buffer to set fields as needed but the page is not in the component buffer. So all of the PeopleCode must be in record field events and not in component PeopleCode events.
Note: It is recommended to clone the delivered search pages (PTS_NUI_SEARCH or PTS_NUI_SEARCH_S) and make the changes you need.
Wednesday, March 7, 2018
Populate custom image (JPG, PNG or GIF) on Fluid Tile
Generally, when setting up tile image in PeopleSoft Fluid, the system accepts only SVG images, but you can bypass this constraint in the following way:
1. Create the image in application designer XYZ_IMG in your desired format.
2. Create HTML definition XYZ_HTML to display image in HTML area
<a href="https://tst-web-epsi/homepage/aspx/login.aspx" target="_blank">
<img border="0" alt="IMG" img src="%Image(XYZ_IMG)" width="130" height="130">
</a>
Make sure to set image width and height to match your tile size.
3. Create application package and insert a class, like below

4. Add following method to viewHTML class
/*Display HTML Tile area with Image*/
import PTGP_APPCLASS_TILE:Tiles:Tile;
class ViewHTML extends PTGP_APPCLASS_TILE:Tiles:Tile
method ViewHTML();
method getTileLiveData();
end-class;
method ViewHTML
%Super = create PTGP_APPCLASS_TILE:Tiles:Tile();
end-method;
method getTileLiveData
/+ Extends/implements PTGP_APPCLASS_TILE:Tiles:Tile.getTileLiveData +/
%This.SetTileContentAsHTML();
%This.TileHtmlArea = GetHTMLText(HTML.XYZ_HTML);
%This.hasLiveDataDescr = True; /* Enables the live data area. */
Local string &String;
&String = "Test Environment";
%This.TileLiveData_1 = &String;
end-method;
5. Navigate to tile wizard, PeopleTools - Portal - Tile Wizard, select desired folder from navigation collection and click Create New Tile.
On the second page select the appropriate app class you created in step 3 of this process.

On page 3 and 4 select appropriate options like which content reference your tile belongs to, tile size etc and save the tile.
6. Add your newly created tile to the homepage, you will now see the new image on your tile.
Thursday, March 1, 2018
Viewport Meta Tag on PeopleSoft Fluid Pages
The viewport is the visible area of a page. By default, the browsers attempt to load the entire page onto the viewport. This makes the page appear very small on some tablets and phones. You should set the PeopleTools default viewport on the post-build of every component and page activate of secondary pages to avoid this problem.
There is a function in 8.54 and a method in 8.55 that will allow you to set this.
In 8.54
Declare Function SetViewport PeopleCode PTLAYOUT.FUNCLIB FieldFormula;
SetViewport(""); /* apply the system default viewport setting */
In 8.55
import PT_PAGE_UTILS:*;
Local PT_PAGE_UTILS:Utils &oPageUtils = create PT_PAGE_UTILS:Utils();
&oPageUtils.SetDefaultViewport();
Friday, February 23, 2018
PeopleSoft News Tile with HTML Area using CSS Part 2
Here we go with Part 2 on how to accomplish this task
Step 1. Create two classic pages in PeopleSoft to add news content, pages can be customized based on your needs.
Page1: This page will be used by the administrator to post the content.
Page:2 This page will be used to add URL's, you can add any other data you want to link to your content
Below is the example:

Page 1

Page2
Step 2. You probably noticed preview button on page 1, this button will display News item preview, to get this simply put HTML area on another secondary page and call it with below logic:
Peoplecode for preview button
&sSearchPage = "NEWS_PREVIEW";
NEWS_WRK.HTMLAREA.Value = GetHTMLText(HTML.NEWS_HTML, &IMAGE, &HEADING, &CONTENT, &HCOLOR, &CCOLOR);
&nModalReturn = DoModal(@("Page." | &sSearchPage), "Preview", - 1, - 1);
HTML code to display HTML area upon clicking preveiw button
<!DOCTYPE html>
<html>
<style>
.w3-container {
padding: 0.01em 16px
}
.w3-container:after,
.w3-container:before,
.w3-row-padding:after,
.w3-row-padding:before {
content: "";
display: table;
clear: both
}
.w3-margin-bottom {
margin-bottom: 10px
}
.w3-orange,
.w3-hover-red:hover {
color: #fff!important;
background-color: #597FCA
}
.w3-row-padding,
.w3-row-padding>.w3-half,
.w3-row-padding>.w3-third,
.w3-row-padding>.w3-twothird,
.w3-row-padding>.w3-threequarter,
.w3-row-padding>.w3-quarter,
.w3-row-padding>.w3-col {
padding: 0 8px
}
.w3-col,
.w3-half,
.w3-third,
.w3-twothird,
.w3-threequarter,
.w3-quarter {
float: left;
width: 100%
}
.w3-col {
padding: 0 8px
}
.iconDetails {
float: bottom;
height: 120px;
width: 120px;
width: auto;
margin-top:20px
}
.content {
white-space: pre-wrap;
word-wrap: break-word;
text-align: justify;
font-size: 1em;
width: auto;
color: % Bind(:5);
font-family: 'Quattrocento', serif;
}
.header {
font-size: 1.5em;
width: auto;
font-family: 'Quattrocento', serif;
color: % Bind(:4);
}
.div:empty {
display: none;
}
.nolinkdiv { display:none; }
ul li a[href=""] {
display: none;
}
ul li a[href=""] + div {
display: block;
}
</style>
<link href="https://fonts.googleapis.com/css?family=Quattrocento" rel="stylesheet">
<body>
<div class="w3-container w3-orange w3-margin-bottom header">
<h1>% Bind(:2) </h1>
</div>
<div class="w3-row-padding ">
<div class="w3-twothird">
<img style="margin-bottom: 1px; border-radius: 8px;" border="0" alt="No Image Found" img src="%Image(% Bind(:1))" class='iconDetails'>
</div>
<div class="w3-third content">
<p>% Bind(:3)</p>
<a class="w3-third content" href="% Bind(:6)" target="_blank">% Bind(:7)</a>
<a class="w3-third content" href="% Bind(:8)" target="_blank">% Bind(:9)</a>
<a class="w3-third content" href="% Bind(:10)" target="_blank">% Bind(:11)</a>
<a class="w3-third content" href="% Bind(:12)" target="_blank">% Bind(:13)</a>
<a class="w3-third content" href="% Bind(:14)" target="_blank">% Bind(:15)</a>
</div>
</div>
</body>
</html>
Step 3. Create a Fluid page with grid, this grid will have just two columns, News ID and HTML Area field

Step 4. Populate HTML area with the content created on page 1 and Page 2 from step 1
Populate the HTML area of the grid with all news items.
PeopleCode:
If &CCLEVEL1_Cnt >= 1 Then
&CCLEVEL1.Sort(NEWS.EFFDT, "D");
For &I = &CCLEVEL1_Cnt To 1 Step - 1
&NewsId = &CCLEVEL1(&I).NEWS.NEWS_ID.Value;
SQLExec("SELECT PTBR_OBJNAME,HEADING_TEXT,LONGJOBNAME2,HEADING_COLOR,CONTENT_COLOR, URL_1,DESCR100A,URL_2,DESCR100B,URL_3,DESCR100C,URL_4,DESCR100D,URL_5,DESCR100E FROM PS_NEWS WHERE NEWS_ID = :1", &CCLEVEL1(&I).NEWS.NEWS_ID.Value, &IMAGE, &HEADING, &CONTENT, &HCOLOR, &CCOLOR, &URL1, &DESCR1, &URL2, &DESCR2, &URL3, &DESCR3, &URL4, &DESCR4, &URL5, &DESCR5);
&CCLEVEL1(&I).GetRecord(Record.NEWS_WRK).HTMLAREA2.Value = GetHTMLText(HTML.NEWS_HTML, &IMAGE, &HEADING, &CONTENT, &HCOLOR, &CCOLOR, &URL1, &DESCR1, &URL2, &DESCR2, &URL3, &DESCR3, &URL4, &DESCR4, &URL5, &DESCR5);
End-For;
End-If;
HTML
<!DOCTYPE html>
<html>
<style>
.w3-container {
padding: 0.01em 16px
}
.w3-container:after,
.w3-container:before,
.w3-row-padding:after,
.w3-row-padding:before {
content: "";
display: table;
clear: both
}
.w3-margin-bottom {
margin-bottom: 10px
}
.w3-orange,
.w3-hover-red:hover {
color: #fff!important;
background-color: #597FCA
}
.w3-row-padding,
.w3-row-padding>.w3-half,
.w3-row-padding>.w3-third,
.w3-row-padding>.w3-twothird,
.w3-row-padding>.w3-threequarter,
.w3-row-padding>.w3-quarter,
.w3-row-padding>.w3-col {
padding: 0 8px
}
.w3-col,
.w3-half,
.w3-third,
.w3-twothird,
.w3-threequarter,
.w3-quarter {
float: left;
width: 100%
}
.w3-col {
padding: 0 8px
}
.iconDetails {
float: bottom;
height: 120px;
width: 120px;
width: auto;
margin-top:20px
}
.content {
white-space: pre-wrap;
word-wrap: break-word;
text-align: justify;
font-size: 1em;
width: auto;
color: % Bind(:5);
font-family: 'Quattrocento', serif;
}
.header {
font-size: 1.5em;
width: auto;
font-family: 'Quattrocento', serif;
color: % Bind(:4);
}
.div:empty {
display: none;
}
.nolinkdiv { display:none; }
ul li a[href=""] {
display: none;
}
ul li a[href=""] + div {
display: block;
}
</style>
<link href="https://fonts.googleapis.com/css?family=Quattrocento" rel="stylesheet">
<body>
<div class="w3-container w3-orange w3-margin-bottom header">
<h1>% Bind(:2) </h1>
</div>
<div class="w3-row-padding ">
<div class="w3-twothird">
<img style="margin-bottom: 1px; border-radius: 8px;" border="0" alt="No Image Found" img src="%Image(% Bind(:1))" class='iconDetails'>
</div>
<div class="w3-third content">
<p>% Bind(:3)</p>
<a class="w3-third content" href="% Bind(:6)" target="_blank">% Bind(:7)</a>
<a class="w3-third content" href="% Bind(:8)" target="_blank">% Bind(:9)</a>
<a class="w3-third content" href="% Bind(:10)" target="_blank">% Bind(:11)</a>
<a class="w3-third content" href="% Bind(:12)" target="_blank">% Bind(:13)</a>
<a class="w3-third content" href="% Bind(:14)" target="_blank">% Bind(:15)</a>
</div>
</div>
</body>
</html>
Result of above code on Fluid page

Step 5. Now create application package to populate HTML area on the Fluid Tile, remember content on this will be dynamic
Peoplecode for App Package:
import PTGP_APPCLASS_TILE:Tiles:Tile;
class ViewHCMCNews extends PTGP_APPCLASS_TILE:Tiles:Tile
method ViewHCMCNews();
method getTileLiveData();
end-class;
method ViewHCMCNews
%Super = create PTGP_APPCLASS_TILE:Tiles:Tile();
end-method;
method getTileLiveData
/+ Extends/implements PTGP_APPCLASS_TILE:Tiles:Tile.getTileLiveData +/
%This.SetTileContentAsHTML();
Local string &IMAGE, &HEADING, &CONTENT, &YEAR, &MONTH, &DATE, &USER;
SQLExec("SELECT TOP 1 P.PTBR_OBJNAME,P.HEADING_TEXT,P.LONGJOBNAME2 FROM PS_NEWS P WHERE P.EFFDT = (SELECT MAX(PP.EFFDT) FROM PS_NEWS PP WHERE PP.STATUS = 'A' AND PP.EFFDT <= GETDATE()) AND P.STATUS = 'A'", &IMAGE, &HEADING, &CONTENT);
%This.TileHtmlArea = GetHTMLText(HTML.NEWS_LIVE_TILE_HTML, &IMAGE, &HEADING, &CONTENT);
SQLExec("SELECT TOP 1 DATENAME(year, P.DATE) ,DATENAME(month, P.DATE) ,DATENAME(day, P.DATE) Your SQL", &YEAR, &MONTH, &DATE, &USER);
%This.hasLiveDataDescr = True; /* Enables the live data area. */
%This.TileLiveData_2 = "Posted by " | &USER | " on " | &MONTH | " " | &DATE | " " | &YEAR;
end-method;
HTML Area for Tile, this is crucial, previous HTML area we created for preview and grid will not work here:
<meta name="viewport" content="width=device-width, initial-scale=1">
<style>
.w3-container {
padding: 0.01em 10px
}
.w3-container:after,
.w3-container:before,
.w3-row-padding:after,
.w3-row-padding:before {
content: "";
display: table;
clear: both
}
.w3-margin-bottom {
margin-bottom: 5px
}
.w3-orange,
.w3-hover-red:hover {
color: #fff!important;
background-color: #F67280
}
.w3-row-padding,
.w3-row-padding>.w3-half,
.w3-row-padding>.w3-third,
.w3-row-padding>.w3-twothird,
.w3-row-padding>.w3-threequarter,
.w3-row-padding>.w3-quarter,
.w3-row-padding>.w3-col {
padding: 0 8px
}
.w3-col,
.w3-half,
.w3-twothird,
.w3-threequarter,
.w3-quarter {
float: left;
width: 100%
}
.w3-third {
float: left;
width: 100% margin-bottom: 20px;
}
.w3-col {
padding: 0 8px
}
.ImageDetails {
float: top;
height: 50px;
width: 50px;
width: auto;
}
.content {
white-space: pre-wrap;
word-wrap: break-word;
text-align: justify;
font-size: 1em;
width: auto;
color: blue;
font-family: 'Quattrocento', serif;
}
.header {
font-size: 1.2em;
width: auto;
font-family: 'Quattrocento', serif;
color: white;
}
.box {
-o-text-overflow: ellipsis;
/* Opera */
text-overflow: ellipsis;
/* IE, Safari (WebKit) */
overflow: hidden;
/* don't show excess chars */
white-space: pre-line;
/* force single line */
width: 100%;
height: 200px;
}
/* Safari 4.0 - 8.0 */
@-webkit-keyframes example {
from {
background-color: #ff7f2a;
}
to {
background-color: green;
}
}
/* Standard syntax */
@keyframes example {
from {
background-color: #2552AC;
}
to {
background-color: #4586FF;
}
}
.div {
background-color: #597FCA;
border-radius: 50px;
-webkit-animation-name: example;
/* Safari 4.0 - 8.0 */
-webkit-animation-duration: 10s;
/* Safari 4.0 - 8.0 */
animation-name: example;
animation-duration: 0.3s;
border-radius: 50px;
}
</style>
<link href="https://fonts.googleapis.com/css?family=Quattrocento" rel="stylesheet">
<body>
<div class="w3-container w3-orange w3-margin-bottom header div">
<h1>% Bind(:2) </h1>
</div>
<div class="w3-row-padding ">
<div class="w3-twothird">
<img style="margin-bottom: 1px;" border="0" alt="No Image Found" img src="%Image(% Bind(:1))" class='ImageDetails'>
</div>
<div class="w3-third content box content">
<marquee behavior="scroll" direction="up" scrollamount="2">% Bind(:3)</marquee>
</div>
</div>
</body>
Take a keen look at CSS on this HTML area which is creating the animation effect and controlling text areas.
Step:6. Create Tile from tile wizard, select application package as tile content and select the class you created for this tile and publish the tile.
Thats it!
Subscribe to:
Posts (Atom)
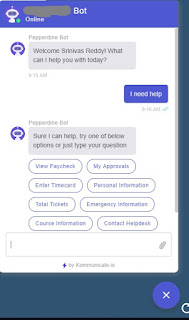
Using Third party Tools to create Chatbot in PeopleSoft Part 3
This is final post to demo the working chatbot in PeopleSoft. Kommunicate supplies you with HTML code to add their chat badge on your Peo...
-
So you are looking to enable mobile/fluid approvals in PeopleSoft? I'll give brief steps and explanation on how to enable and configu...
-
PeopleSoft Fluid does not have default search page like in Classic. There are 3 ways for now to create your search page: 1. Real-Time S...
-
 Here we go with Part 2 on how to accomplish this task Step 1 . Create two classic pages in PeopleSoft to add news content, pages can be c...