Thursday, February 6, 2020

Using Third party Tools to create Chatbot in PeopleSoft Part 2

Now that Dialogflow setup is complete which will act as your NLP, it is time to write your Django application which will act as a webook from dialogflow.

It is super simple to create your first Hello World! app, visit and try creating a sample app https://www.djangoproject.com/, once you get familiar with Djangoyou are ready to go, below is an example of view I created in Django application which will provide webservice.

This screenshot is from my views.py file in Django Application. Below code is basically a providing a webhook/fulfillment response to  Dialogflow NLP (Refer to part 1 step 7)


Once you write your django app, you will need to run it on your local webserver port 8000 using following command from command prompt...python manage.py runserver, your app should run now with out errors


Now its time to use NGROK to expose your webserver to internet, use this only for development for production you need to create a secure webserver

ngrok http yourport will expose your local webserver to internet


Copy forwarding https url and paste it in your dialogflow application, your Django application is now ready to receive web-service requests.

Since we are using Django now as a webhook not PeopelSoft rest service, sky is the limit to integrate your chatbot to any third party applications to fulfill user chat requests

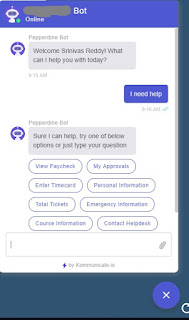
In part 3 I will show a working prototype of Kommunicate chat

Thursday, December 5, 2019

Using Third party Tools to create Chatbot in PeopleSoft Part 1


There are number of ways to create your custom Chatbots using various tools and approaches, some tools and libraries are open source while some need licensing.

Languages used:

1. Python

2. Peoplecode

Tools you need:

1. Good IDE for Python (I used Anaconda - Spyder, this installation will automatically install many dependencies we need for project while coding in Python)

2. PeopleSoft Integration Broker

3. Command Prompt (for running webserver on your machine and hosting your python app to the world)

Third party Services:

Dialogflow (will be our NLP, Natural Language Processor)

NGROK (NGROK creates public URL for our webhook for quick testing, you need to create your own webserver in production)

Django (We will use Django to build our python based web app)

Explaining everything in details is very difficult in the posts but video might be better, I will do my best to go through all topics briefly.

Lets go through all the steps now:

Setup in Dialogflow

1. Create a account with Dialogflow, they have free developer account. (Take some classes on how to use DialogFlow application, they have many free resources.)

2. In the intents tab, create a intent, for demo I will discuss about example intent get.NameFrom CWID. Purpose of this intent is to get a Name of the Operator ID from PeopleSoft


3.  Add some training phrases, this will be the utterance in the form of text or speech from the end user, save and train the data


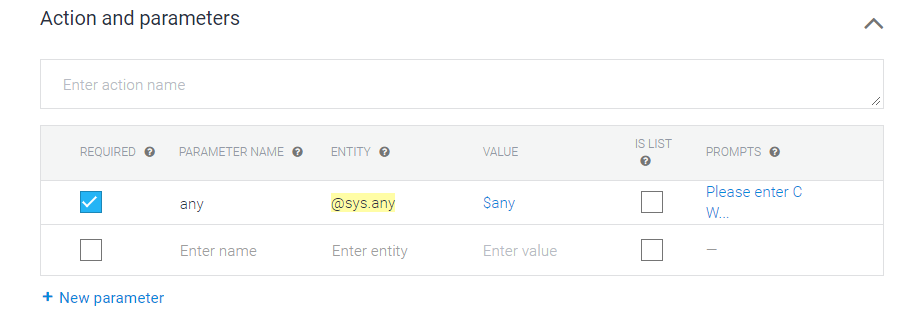
 4. Collect the parameters from the user, dialogflow will collect all the parameters, in this case we will get Operator Id


 5. We can also add our own prompt questions to collect user input

 6. Once all parameters are collected we are now ready to fulfill the request

 7. Go to fulfillment tab, add a URL pointing to your fulfillment webhook. This webhook will receive a post request, you endpoint should be able to read the request and provide response


Check out part 2

PeopleSoft Custom Chatbots

So there is lot of buzz around Chatbot being delivered by PeopleSoft and how Artificial Intelligence is making its way in to ERP systems like PeopleSoft, as a PeopleSoft developer I have same curiosity how this new technology of Chatbot will work. So I started taking a close look at how we can integrate PeopleSoft with IoT's like Alexa, Google Assistant and I was successful in experimenting both and had a working solution. In fact I was able to create my own text classifier using open source AI libraries like TensorFlow with the experience I gained while learning the Chatbot framework.

I'm not going to write this blog post by copying content from some where, instead my own findings on how I did it, so you will find my language on technical terms and my Chatbot journey little amateur.

When I started reading different posts, participating in webinars and user group meetings I was curious to see if I can develop a CHatbot platform and integrate it with PeopleSoft, but I had no I idea where to start? Grrr this took me lot of time before I started working on a hands on project.

Click below links to see how I created Chatbots using different ways

Using Third party Tools to create Chatbot Part 1
Creating our own Chatbot Framework

Wednesday, October 16, 2019

Creating Your First Simple Fluid Page

Now that you are given a task to create your first fluid page and if you are stumbled where to start with then this post will give you some direction.

You probably already know Fluid pages do not work like classic pages meaning WYSIWYG (what you see is what you get) is not supported. Instead you have to style each and every element on the fluid page using CSS and Groupboxes.


go to application designer 

1. PeopleSoft recommends using delivered template fluid pages, I always start with PSL_APPSCONTENT to use as template. Select and create MY_TEST_PAGE_FL and say yes to dialog box Do you wish to also save a copy of the PeopleCode associated with PSL_APPS_CONTENT?


2. Go to page properties, select 'Use' tab, select drop down you will see various options, for now leave this as a 'Standard Page' meaning your main application content will be displayed on this page during the run time just like classic.

3. Add this page to component, depending on your requirement add your own search record or use INSTALLATION table if you are not ready yet. In Component properties, go to 'Fluid' table and check 'Fluid Mode' flag. Leave everything else default.


Note: If you are using your own search record then check this post

4. Register your component in 'Fluid Structure and Content' folder from PIA at appropriate location.


5. Publish it as a tile or add this content reference to your home page as tile manually and test.


Tuesday, July 31, 2018

PeopleSoft Conditional Navigation

With the introduction of PeopleSoft Fluid User Interface in PeopleTools, PeopleTools offers the capability to render a page either in classic mode or fluid mode based on conditions and factors. Additionally, you can direct a user to a different content reference, instead of the default content reference, based on conditions and factors.

Here is an example and also an issue you will run into while implementing Fluid Approvals:

After setting up Fluid Approvals, you can notify the user using Emails or through worklist to approve items. 

So issue occurs when you already have a classic page and new fluid page is delivered for the same approval area. Let's say Voucher Approval had a classic page in past but with new application version, you have fluid voucher approval page. 

Assuming you started using fluid approval page for voucher approvals, the user is sent email to approve the voucher, when user clicks on email link user is directed to classic page instead of fluid page even though user is having proper security to access fluid approval page.

This is because conditional navigation is not setup on content references of both voucher classic and fluid pages.

To setup conditional navigation, navigate to cref in question for both classic and fluid approval voucher pages and add following attribute values

For classic page:
Name: CN_DISPLAYMODE_1
Attribute Value: FLUID=CREFNAME of Fluid Page where you want to route

For fluid page:
Name: CN_DISPLAYMODE_1
Attribute Value: CLASSIC=CREFNAME of Classic Page where you want to route

Uncheck translate checkbox and save the page, this should take care of Email URL's and CREF's from portal navigation.

Note: Setup needs to be done vice-versa (Classic and Fluid) and make sure URL link that is generated points to the same node as the CREF

Thursday, July 26, 2018

Mobile/Fluid Approvals in PeopleSoft

So you are looking to enable mobile/fluid approvals in PeopleSoft?

I'll give brief steps and explanation on how to enable and configure fluid approval pages.

Setup Security:

Give users who plan to use mobile approvals proper security, there is delivered role Approvals Fluid. After assigning this role to users, users will be able to see the mobile/fluid approvals pages.

Publish Tile:
  1. Go to PeopleTools - Portal - Structure and Content - Fluid Structure Content - Fluid HomePages
  2. Edit the HomePage label where you want to publish the Approval Tile, in Tile Content navigate to group box PeopleSoft Common Architecture and make sure Approvals check box is checked and select Opt-Dflt (Optional Default) drop down value or any other value based on your requirement then use Tile Publish button on the top of the page to publish the tile. (Note: After clicking tile publish button, on the modal page make sure Approvals tile checkbox is selected the publish)
  3. Verify that all users with Approvals Fluid role are seeing Approvals tile on the home page you published on step 2.
Modifying Delivered Mobile/Fluid Pages:

If there is a need to modify delivered mobile/fluid pages use Page Composer and Page Composer Dev Registration to modify look and feel of the pages, adding additional fields etc

Note: Navigation to Page Composer and Page Composer Dev Registration can be found in Portal - Structure and Content - Fluid Structure Content - Fluid Pages - Common Architecture. You can add both tiles to your homepage.

Using Page Composer you can:

  • add or remove additional sections
  • add or remove additional fields 
  •  modify look and feel.
Using Page Composer Dev Registration tile you can:

  •  add additional pages for specific form factor, 
  • add source records to get and display data on the page
  • add PeopleSoft logic by mapping field events to custom app packages.
Workflow:

InShort, Mobile/Fluid pages use existing AWE setup for approvals routing and notifications. 

Note: If there are customizations on your AWE, use Page Composer Dev Registration to change application source records and composition key fields then use Page Composer to add custom fields on to your approvals pages.

Configure Mobile Approval Options:

Navigate to Root - Enterprise Components - Approvals - Mobile Approval Options

You can specify various options on how mobile approvals will work like the number of approval lines to display, allow/deny mass approvals, display or hide Approve/Deny/Pushback/Hold buttons, making comments required when denying the transaction or changing images on navigation of specific approval component.


Friday, June 29, 2018

AJAX call to Web API then use JSON data source

Here is an example on how to make AJAX call to Web API.

To explain this scenario I will give an example of how to make weather API call, before we dive into how to code, let's see the end product:

You can use PeopleSoft input field as well to make AJAX call but for demo I used HTML area on a PeopleSoft page.

Here is step by step process on how to do this:

1. Create a fluid page and add tile on to your homepage.


2. Create work record and add HTMLAREA field to the work record, create new HTML definition, then insert HTML area on your fluid page and assign this work record.field name to page's HTML area.

3. In page activate add following peoplecode, this populates your HTML area with your HTML code, you will be writing HTML code in next step

AJAX_WTHR_WRK.HTML_AREA_01.Value = GetHTMLText(HTML.AJAX_WEATHER_CALL);

4. Now add following code to your newly created HTML definition from step 2


5. Test your code from your fluid tile, you will have working weather app


Here is how this code is working:

In your HTML area, you have two div elements, one takes input and other gives you the output.

In the input text area, we are using oninput DOM Event to call loadAJAX function from JavaScript, the movement browser detects user input loadAJAX function is called.

<input type="text" id="CityOrZipCode" oninput="loadAJAX()" Value="">


In loadAJAX function, we are making an XMLHttpRequest AJAX call to our weather API url, this silently makes the call behind the scenes of the browser and updates your page elements without refreshing the whole page, thereby reducing traffic between server and client.

If you right-click and inspect your browser on Network tab you will notice how we are sending requests to browser and getting the response. Status 404 says bad request and 200 is a success.

When we typed D or Da in the input text area weather API call failed, but the moment it found a city with Dal, Dall or Dallas it returned status 200.


This code checks if AJAX call is a success:

if ((request.readyState === 4) && (request.status === 200)) 

Since our AJAX call is successful, now we are getting JSON  response then parse it, then get the values you need from JSON and do required calculations and store your values in variables.

Using DOM's innerHTML property we will update the output div elements with the variables we created.

var modify = document.getElementById('Update');

 if (!CityOrZipCode) {
                            modify.innerHTML = "Enter City or Zip Code";
                        } else {
                            modify.innerHTML = "Bad Request, City or Zip Code not found";
                        }

var WindSpeedmodify = document.getElementById('WindSpeedUpdate'); WindSpeedmodify.innerHTML = "";

This example should give you a good starting point to add AJAX to your pages.

Using Third party Tools to create Chatbot in PeopleSoft Part 3

This is final post to demo the working chatbot in PeopleSoft. Kommunicate supplies you with HTML code to add their chat badge on your Peo...